Here we will explain about How to Install Hard Disk on Computer in depth so that hopefully will provide an in -depth understanding for you.
What is Hard Disk?
Hard Disk is permanent data storage devices and will not be lost even if the computer or PC is turned off.
This is what distinguishes a Hard Disk from RAM which is also used as a storage medium, but in RAM the data is only stored temporarily and will be lost when the computer is turned off.
Traditional hard disks use magnetic disks that rotate at high speed, with various storage capacities such as 250GB, 500GB, 1TB, 4TB and so on.
However, there is another type of storage media that is relatively new, namely SSD aka Solid State Drive which does not rely on magnetic disc rotation, but is more or less the same type as a Memory Card so that it can access stored files more easily.
Difference Between IDE and SATA Hard Disks
Hard Disk Connectors consist of 2 types, for old models usually still use IDE (Integrated Drive Electronics) or also known as PATA (Parallel Advanced Technology Attachment) while new models, both hard disk disks and SSDs already use SATA (Serial) connectors. Advanced Technology Attachments) .
The type of connector on the Hard Disk is also the main thing that must be considered before installing the Hard Disk on the motherboard of a computer / PC, because you must ensure the availability of the connector on the motherboard where the Hard Disk will be installed.

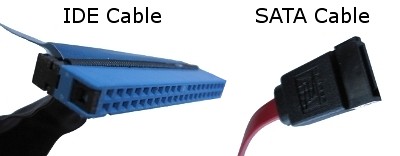
Look at the picture above, you can clearly see the difference between an IDE cable (blue on the left) and a SATA cable (black on the right).

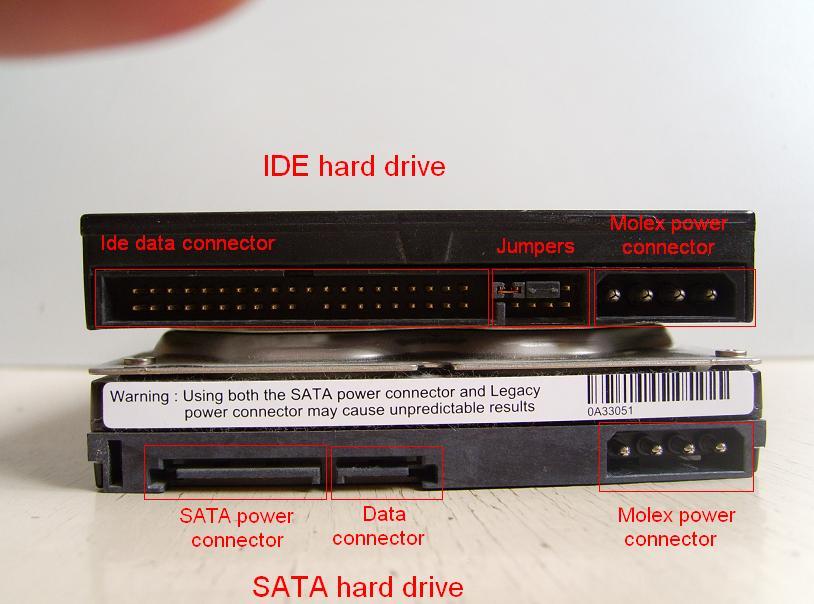
While in the second picture above you will see the difference between the connectors on the IDE Hard Disk (the hard disk on the top stack) and the SATA Hard Disk (the bottom stack of the hard disk).

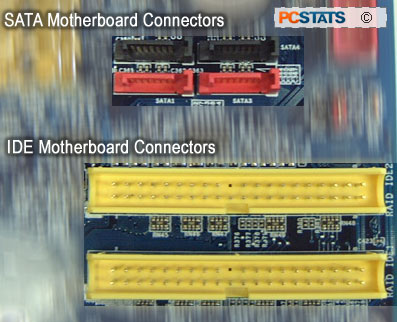
In the picture above you will also be able to see the difference between the IDE and SATA slots on the motherboard, where the IDE slots are the yellow ones while the SATA slots are the black and red ones.
We will explain the full differences between these two types of Hard Disk connectors in the next article, so don’t forget to often check our website if you’re curious to know the difference between the two.
The number of slots on the motherboard, be it IDE or SATA, will determine how many hard disks (or other devices that use those slots) you can install at once, so if you plan to install 3 SATA hard disks don’t buy a motherboard that only has 1- 2 SATA slots.
Not only that, because as shown in Figure 2 above, every hard disk, whether IDE or SATA, will require power from the power supply ( PSU ) to be connected via the Molex Power Connector slot, so make sure your PSU has a proper Molex connection. sufficient (or more) with your needs.
How to Install Hard Disk
After understanding about the types of connectors and slots of a hard disk, of course, it will be easier for you to install the hard disk on the motherboard, and don’t worry because SATA or IDE cables are also sold separately if you find yourself lacking.
In general, installing a hard disk is not a difficult thing, especially if you have understood the information we have provided above, but to clarify we will divide two explanations between how to install an IDE hard disk and how to install a SATA hard disk.
A. How to Install an IDE Hard Disk
To install an IDE Hard disk, make sure the connector (for example the blue one in figure 1) is properly connected to the hard disk, and when inserting do not force it, and check and adjust the arrangement of the pins on the Hard Drive with the arrangement of the holes on the connector cable.
If this hard disk will be used as the primary hard disk, make sure no jumpers are installed (see the IDE hard disk image in figure 2 above). A more detailed explanation of the jumper we will explain in a future article.
Make sure the computer is completely turned off and the power cable to the PSU is not plugged in to avoid things that are not desirable.
Next, insert the hard drive in the rack provided on the computer case, generally the disc side will face down, and match the holes provided on the side of the hard drive with the holes in the hard drive rack.
The hole will later be used to lock the hard disk so that its position is solid and not easy to shake, be it on a casing with a model that uses bolts or a model without bolts (screwless).
After the hard disk is in the right position and the side has been locked, plug the unplugged part of the connector cable into the hard disk on the motherboard, in the slot shown in 3 above (the yellow one).
Then, the final step is to plug the Molex cable dangling from the PSU into an available slot on the hard disk.
Done, the hard disk has been installed and you can try turning on the computer to test whether the device has been detected or not.
B. How to Install a SATA Hard Disk
The steps that need to be taken when installing a SATA hard disk are more or less the same as those taken to install an IDE hard disk, but the difference is in the slot and the connector cable only.
In pictures 2 and 3 above, you can see an indentation that is shaped like the letter L on the SATA connector, so when installing the cable make sure the slot on the cable is in accordance with the indentation so that it will be installed perfectly without needing to be forced.
SATA hard drives also require a Molex power connector from your PSU , so make sure there is a spare Molex cable available on the PSU before installing the SATA hard drive.
After it is installed perfectly, please turn on the computer to check whether the hard disk has been detected or not.
Hopefully our explanation of How to Install a Hard Disk will be able to help you get to know and explore more about the topics we discuss in this article.
