In this article, I will discuss what is cPanel and how to use it. After knowing all the features, benefits and functions of cPanel, I will discuss how to use cPanel for your server.
What is cPanel Hosting?
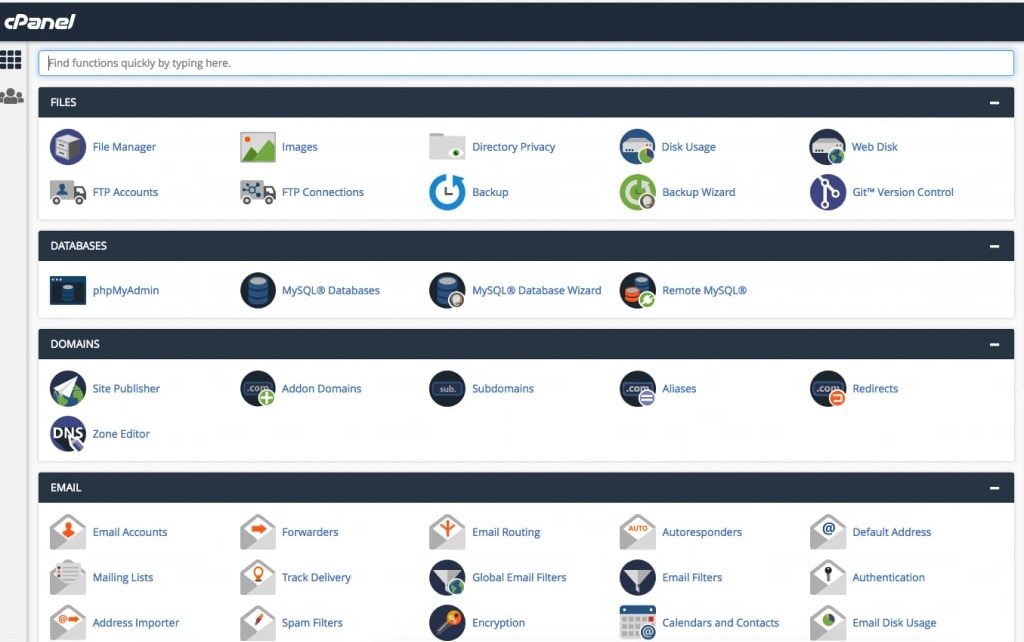
cPanel is a control panel that is used to make settings on web hosting services which include file management, database, domain, security, software and other configurations. Without cPanel, web hosting settings can only be done via text commands. cPanel makes it easy for users to perform various configurations through an attractive and easy-to-operate user interface.
cPanel is usually installed on a Dedicated Server or Virtual Private Server (VPS) that uses the Linux, FreeBSD, and similar operating systems. Applications supported by cPanel include Apache, PHP, mySQL, Postgres, Perl, Python, and BIND, with email such as POP3, IMAP, SMTP services.
Security Management
In this tool you can also control the server using SSH Access. Quoted from cpanel.com, for security management there are Hotlink Protection and IP Blocker menus. You can block certain IPs that indicate website spamming using an IP Blocker. To further strengthen website security, you can add paid SSL in the SSL/TLS Menu for more security.
Change Password, User Data, Language and Display
If you are bored with the same appearance, you can change the appearance of cPanel Hosting at will. You can also change the password and user hosting data directly in cPanel. Lazy with English? You can change the language settings in the Change Language Menu.
cPanel Hosting Dashboard
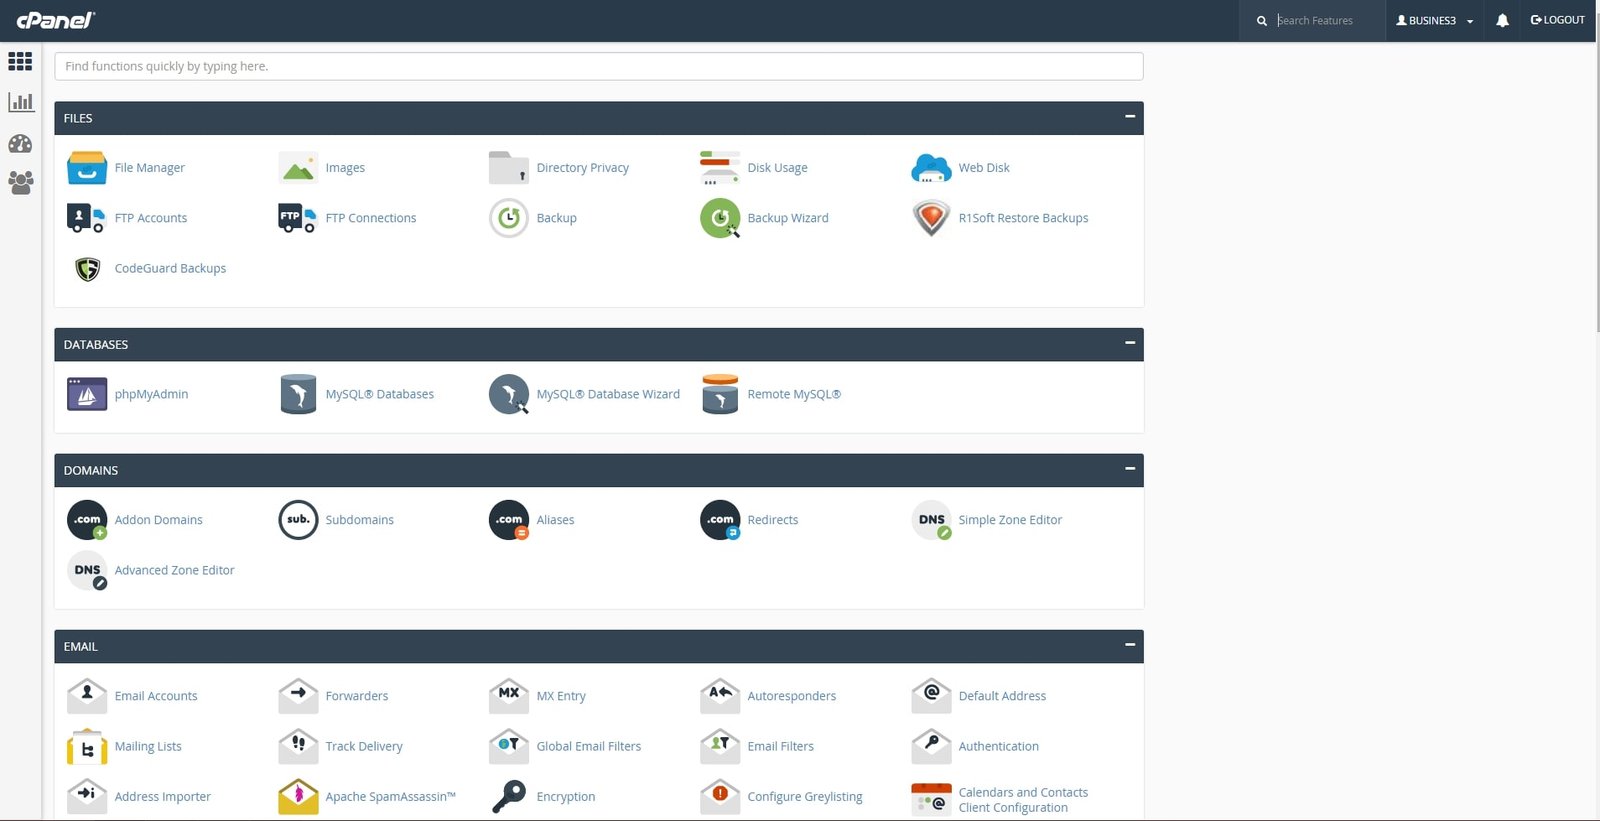
Through this support, your cPanel hosting can do the following things.
- Setting up PHP and Apache Handler.
- Manage emails pointing to your domain.
- Upload/restore/backup website files.
I will discuss the full functions and features of cPanel in the next section.
Functions & Benefits of cPanel
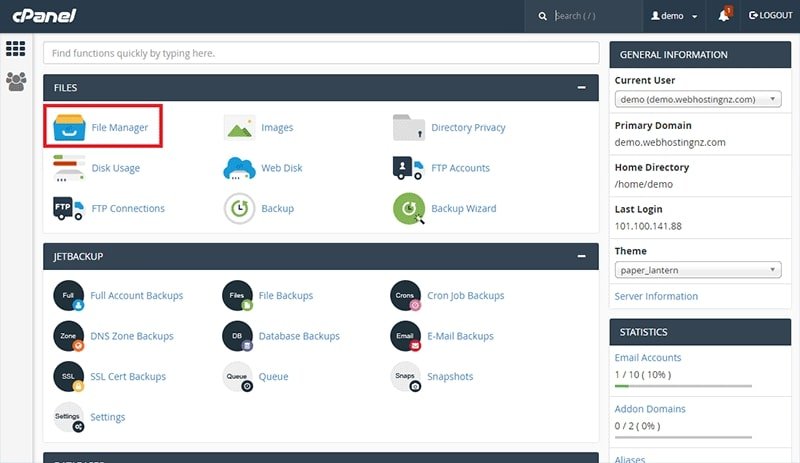
In simple terms, the function of cPanel is to make it easier to manage websites that are in your hosting account. cPanel greatly simplifies configuration related to domains and hosting. In addition, cPanel can also add several additional applications that need to be installed to support the website to work properly.
So, the main function of cPanel is to make it easier for users. Below are the aspects that are made easier by the presence of cPanel:
File Management
With cPanel Hosting, you don’t need to go to the server to just move files, create new files, upload website files and so on. With the File Manager menu, you can do all these things easily. There is also a Backup and File Restoration menu that makes it easier for you in the backup restore process. Want to know how much hosting capacity can still be used? You can click the Disk Usage Menu.
Database Management
The presence of a website cannot be separated from the database. For ordinary people, manually creating a database on hosting may be difficult. Well, the presence of these tools will make it easier for you of course. In cPanel, there are 2 popular databases that can be used, such as MySQL and PostgreSQL. There is also a menu for phpMyAdmin, phpPgAdmin, to remote MySQL.
Domain Management
cPanel can also be used for domain management, you know. You can create addon domains, create subdomains, redirect domains, Aliases settings and DNS settings. This DNS setting is very useful for those of you who want to direct the domain to another server, do a custom domain or direct the domain to hosting. For DNS settings, please select Zone Editor for those of you who are still beginners.
Email Management
With this tool, you can create email with your own domain, using the Email Accounts menu. You can also select the Autoresponders menu to make email replies automatically. There is also an Email Filters menu to filter incoming email. According to panel.com, there is an Apache SpamAssassin menu and Authentication for email security.
Graphs and Data
In addition to settings and configuration matters, you can view graphs and data from the website. You can view monthly website visitor data by selecting Menu Visitors. You can also view website logs by selecting Menu Errors, Awstats and Webalizer. Want to know your running bandwidth? Please select the Bandwidth Menu.
Choose cPanel or Plesk?
Actually there are various web hosting control panels that can be used such as Plesk or Webuzo. But according to ReviewHell in cPanel vs Plesk: Picking The Right Control Panel, there are several reasons why you should choose cPanel over the Plesk hosting control panel.
- Suitable for Linux Server Hosting . Moreover, combined with CloudLinux, this tool has high performance for Linux Hosting. While Plesk, is more suitable for Windows Hosting.
- Make it easier for customers to migrate hosting . If the servers used are both using these tools, then the migration process is easy to do. Unlike Plesk, although they both use Plesk, the hosting migration process is quite difficult.
Getting to Know the Features in cPanel
When you first see the appearance of cPanel, you may be confused because of the many menus available. So that you don’t get confused when you want to use it, let’s get acquainted with the features in cPanel.
1. Website File Management Features
Broadly speaking, cPanel provides file management features that can be used to delete, edit, and copy website files that are on the hosting. In addition, there are also FTP settings that you can use to access website files from the FTP Client application without having to login to cPanel first.
For more details, here is an explanation of cPanel features related to file management:
- File Manager is used to upload, create, delete and modify files without the need for FTP or other applications;
- Images is used to organize files in the form of images. Here, you can resize the image and change the image format;
- Directory Privacy is used to restrict user access to certain settings via password;
- Disk Usage displays the percentage of disk usage;
- Web Disk is used to access files in cPanel just like a local drive on a computer;
- FTP Accounts used to access and manage File Transfer Protocol (FTP);
- FTP Connections used to connect or disconnect FTP connections;
- Backup is used to backup website content and cPanel content in zip form;
- File Restoration is used to restore backed up files;
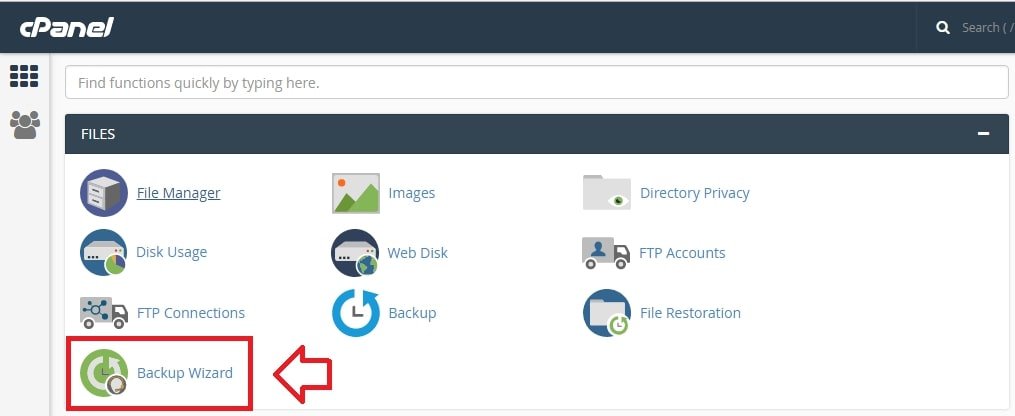
- Backup Wizard use this feature to get help when doing backups.
2. Domain Management Features
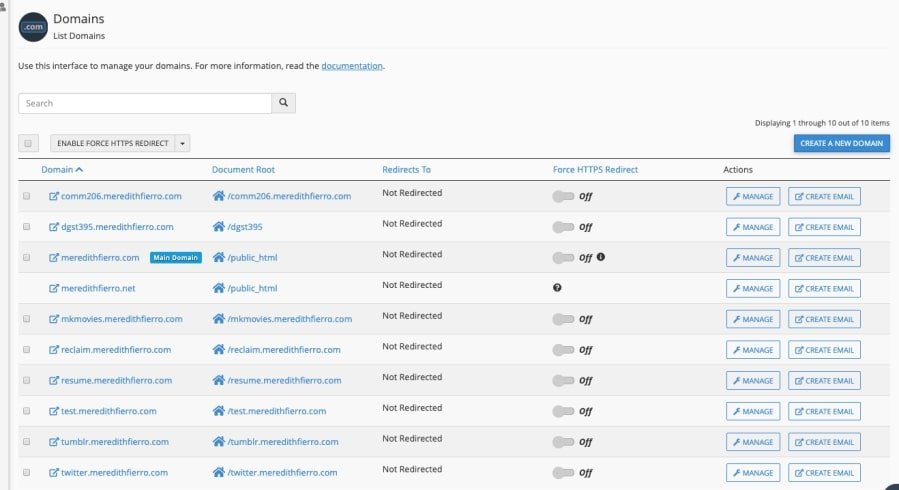
One of the cPanel menus allows you to set up the domain. The menu contains features of addon domains, subdomains, redirects, and so on. The features available there can be used to control how cPanel handles requests when the browser accesses your domain.
For more details, here is an explanation of cPanel’s features related to domains:
- Site Publisher can be used to create a website with a wide selection of templates. This option can also be used to clearly display contact information;
- Addon Domains is used to add domains in a single cPanel account;
- Subdomains is used to add subdomains in a cPanel account;
- Aliases is used to add a URL alias for a website;
- Redirects are used to redirect from one specific page to a website. This feature can also be used to add a shortened version of the URL on a website;
- Simple Zone Editor is used to create and edit A and CNAME records;
- Advanced Zone Editor create, modify, or delete A, AAAA, CNAME, SRV, and TXT from DNS records;
- Zone Editor is a combined function of Simple Zone Editor and Advanced Zone Editor. Used to add, edit, or remove A, AAAA, CNAME, SRV, MX, and TXT from DNS records.
3. Email Settings & Management Features
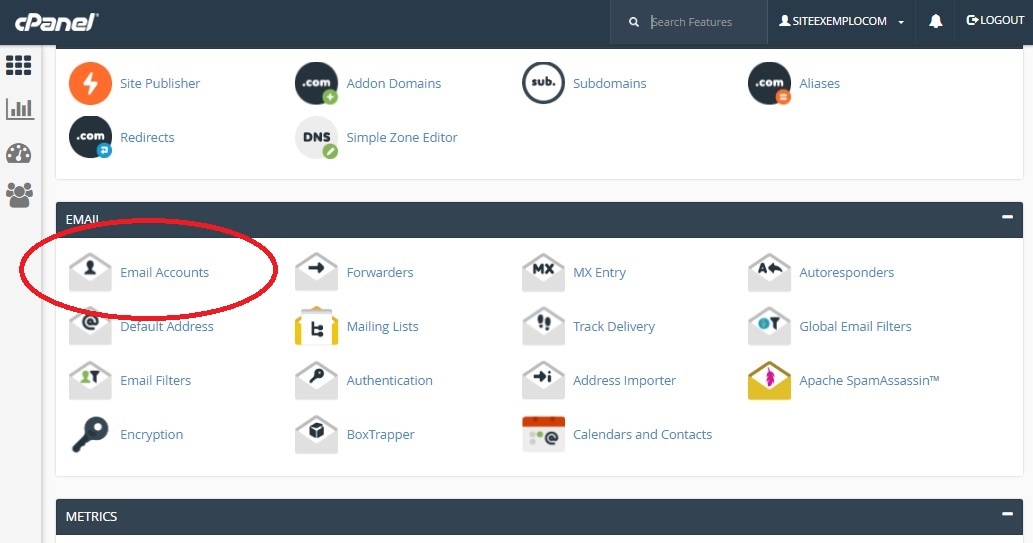
cPanel also provides a menu containing various features related to email. You can create a new email address with your own domain name here. In addition, there is also a feature to open and view incoming emails, complete with the storage capacity used for each email account.
So that you can get a clearer picture, here is a description of cPanel features related to email management:
- Email Accounts is a view for managing email accounts linked to a domain;
- Forwarders feature to forward email to one or more designated email addresses;
- Email Routing a useful feature for routing incoming email to a specific server;
- Autoresponders are used to create automatic replies to emails. This feature is useful for giving notifications such as you can’t reply to emails instantly;
- Default Address is used to set the default email address. This feature allows you to keep receiving emails from senders who mistyped the email address;
- Mailing Lists is used to create email lists that make it easy for you to send emails all at once;
- Track Delivery useful for tracking or monitoring the email delivery process;
- Global Email Filters adds filters for email accounts contained in cPanel;
- Email Filters added a custom email address filter. This feature is also useful for preventing you from spam, email redirects, email forwarding from the program;
- Authentication is used to secure the e-mail server and view outgoing e-mail information. The same feature can be used to verify if an email is sent by a trusted source;
- Address Importer is used to import documents so that they can be sent simultaneously to several addresses at once;
- Apache SpamAssasin useful feature to identify spam emails;
- Encryption encrypt messages to keep them safe and confidential;
- Configure Greylisting secures email linked to a domain from spam;
- Calendars and Contacts is used to configure calendars and applications in cPanel;
- Email Disk Usage shows the disk capacity used for email.
4. Database Management Features
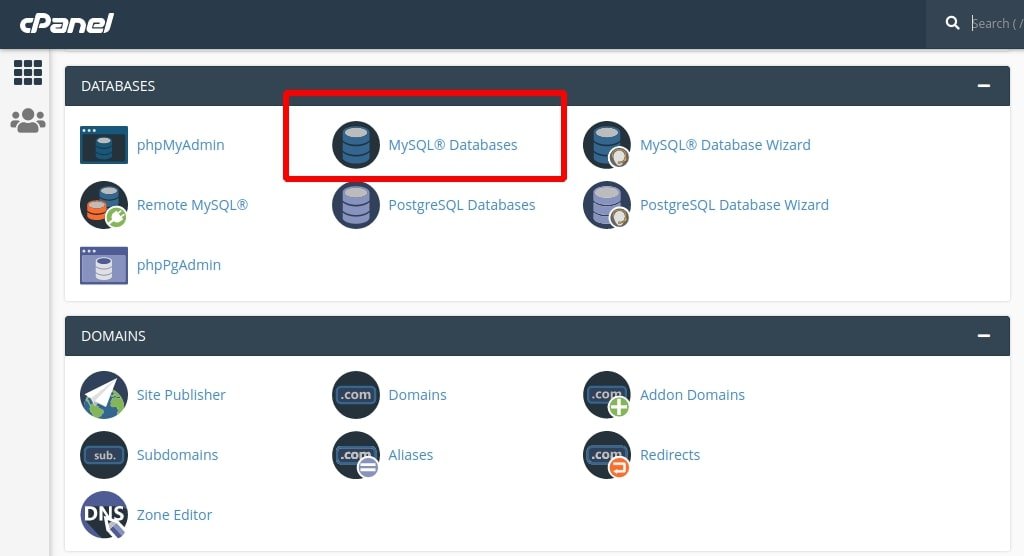
You can also manage databases through the menus found in cPanel. One of the features contained in the database menu is the feature to open phpMyAdmin. In that menu, you can also add delete existing databases and grant access rights to authorized accounts.
5. Features of the PHP Module Configuration Used
Feature view for managing PHP in cPanel
One of the most important parts of web hosting is its ability to run the system or website properly. The requirements that usually need to be adjusted are the PHP version used and the available modules. cPanel is able to provide that convenience by providing a feature for selecting the PHP version you want to use. You can even install PHP Extension yourself from a separate file.
6. Security Settings Features on Hosting
Security menu display in cPanel
cPanel is able to simplify your work in managing security on the website. You can use all of the features below to avoid crime in cyberspace.
- SSH Access is used to securely connect you to the server via the command line;
- IP Blocker avoid access to websites via IP Addresss;
- SSL/TLS section for managing SSL/TLS keys, certificates and requests. This section can also be used to improve website security;
- Hotlink Protection prevents other websites from displaying your website content using the bandwidth you have;
- Leech Protection set the number of logins that can be made in the span of two hours;
- SSL/TLS Status displays the SSL/TLS status. This section is also used to upgrade or renew SSL/TLS certificates;
- Let’s Encrypt SSL is used to add the free SSL output of Let’s Encrypt.
7. Website Backup and Restore Process Features
Another important cPanel feature is the ability to perform backups and restores. You can enjoy a full backup facility that instantly backs up all data including databases. This is certainly very helpful. For a complete guide to backing up data, please read → How to Download Website Backup Files on cPanel
How to Use cPanel
In the previous section you were familiar with the features of cPanel, right? There are so many, you probably won’t use them all right away. However, there’s nothing wrong with learning to use cPanel’s features so that you’re ready when you need them. Let’s learn one by one!
How to Use cPanel File Manager

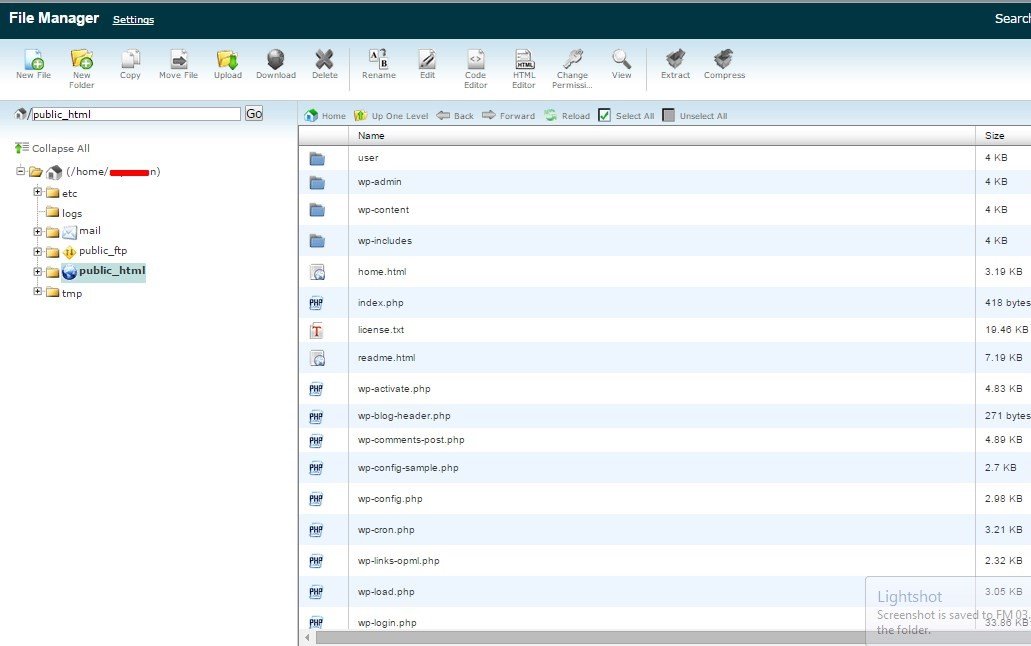
File manager is a feature to access all your website files. With it, you can manage files, such as delete, move, and copy them.
If you are using a Windows device, you may be familiar with the cPanel file manager interface. The interface can be divided into four sections:
- Folder list
- List of folder contents
- Navigation menu
- File and folder management menu
1. Folder List in File Manager
The list of folders is located on the left of the screen. To open a folder, you just click one time.
2. List of Folder Contents in File Manager
When you open a folder, its contents are displayed on the right side of the screen. The folder’s table of contents also displays some file information, such as:
- File size
- Last change time
- File type
- permission
To open a file or folder in this section, you need to double-click it.
3. Navigation Menu in File Manager
The navigation menu is a row of menus located above the list of folders and their contents. The following are the available menus and their functions:
- Home : to return to the main folder
- Up One Level : to return to a folder that is one level above the currently accessed folder
- Back/Forward : to return to the last accessed folder
- Reload : to reload the contents of the currently accessed folder
- Select All : to select all the contents of the currently accessed folder
- Unselect All : opposite of Select All
- View Trash : to display deleted files and folders in the trash . folder
- Empty Trash : to permanently delete files and folders in the trash folder
4. File and Folder Management Menu
Just above the navigation menu is another row of menus for file management. However, you can also access these menus by right-clicking on a file or folder. The following are the available menus and their functions:
- File : to create a new file
- Folder : to create a new folder
- Copy : to copy files or folders
- Move : to move files or folders
- Upload : to upload files or folders
- Download : to download a file or folder
- Delete :to download a file or folder
- Restore : when accessing the trash folder, this menu is used to restore deleted files or folders to their original folder
- Rename : to rename a file or folder
- Edit and HTML Editor : to edit the file code
- Permissions : to change permissions to files or folders
- View : to see the contents of the file
- Extract : to extract compressed files or folders
- Compress : to compress files or folders
How to Check Disk Space Usage in cPanel
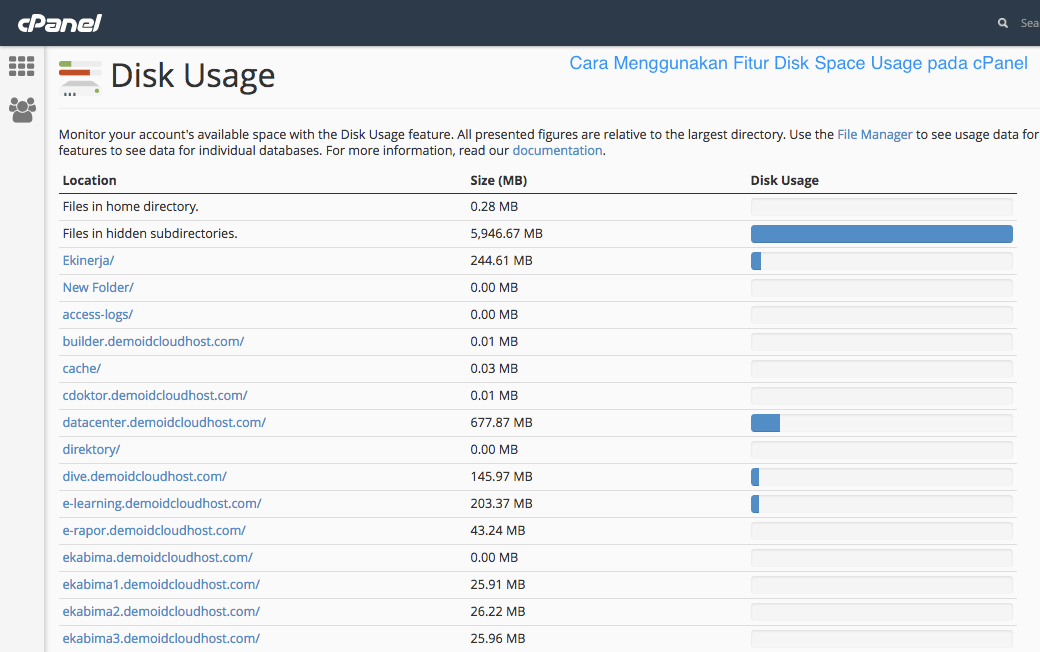
As a website owner, it is mandatory for you to pay attention to the portion of your hosting disk space usage. Well, in cPanel there are two ways to check it. First, you can immediately see the remaining storage capacity on the right side of the cPanel under the Disk Usage text .
If you want to see disk space usage statistics, you can click the Disk Usage menu in the Files menu category .
In this menu, cPanel displays the folders in your hosting account and their sizes. You can click the > sign to see the folders in a folder. If you click on a folder name, you will be taken to that folder in the file manager.
How to Backup Website in cPanel
It is important for you to do periodic backups to have a backup of website data. Well, in cPanel there are three types of backups that you can make, namely:
- Full account backup : back up all hosting account data
- Full website backup : only back up website data, such as files and databases
- Partial website backup : backup only the website data you choose
The guide below will explain how to create each of these types of backups.
1. How to Make a Full Account Backup in cPanel
cPanel creates full account backups automatically. So, all you have to do is download the backup for storage. To access those backups, click Full Account Backups in the JetBackup menu category .
On the next page, select the backup you want to download and click Generate Download .
The Add to Download Queue button will appear . Click the button to start the backup download. The process will take some time.
Now a Download button appears next to the backup you selected. Click the button to download it.
2. How to Make a Full Website Backup in cPanel
To create a full website backup, click Backup Wizard in the Files menu category .
On the next page, click Backup .
On the next page there are two options, namely full and partial backups. Because you want to back up all website data, choose full.
The next step is to choose a place to save your backup. There are four options for you to choose from:
- Home directory : on your hosting server
- Remote FTP server :on another server via FTP connection
- Remote FTP server (passive transfer mode) : on another server via FTP passive transfer mode
- Secure copy : on another server via secure copy protocol
If you have already selected, click Generate Backup . The option to download the backup will appear once the process is complete.
3. How to Create a Partial Website Backup in cPanel
As you’ve seen earlier, the option to create a partial backup is also in the Backup Wizard menu. To use it, you just have to choose one of the following three types of data:
- Home directory (website files)
- MySQL database
- Email forwarders & filters
On the next page you don’t need to select a backup storage location. You just click on the existing download button.
How to Check Bandwidth in cPanel
Like disk space, you also have to pay attention to hosting bandwidth usage. Especially if your hosting plan’s bandwidth is limited. Well, how to check it in cPanel is easy.
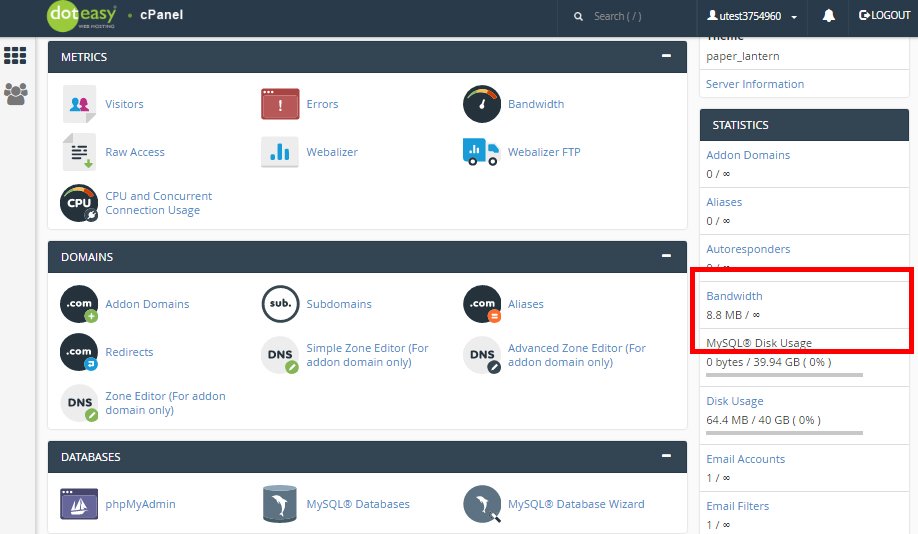
To check bandwidth usage in general, check the list of statistics on the main cPanel page.
However, if you want to know the usage in more detail, click the Bandwidth menu in the Metrics menu category .
In this menu, you can see graphs of bandwidth usage in the last 24 hours, one week, and one year. The graph also shows the types of protocols that use your bandwidth, such as HTTP, FTP, IMAP, POP3, and SMTP.
How to Create a MySQL Database in cPanel
Creating a database may be confusing if you are new to IT. Luckily, cPanel makes it easy for you. The steps are described below.
1. Create a MySQL Database
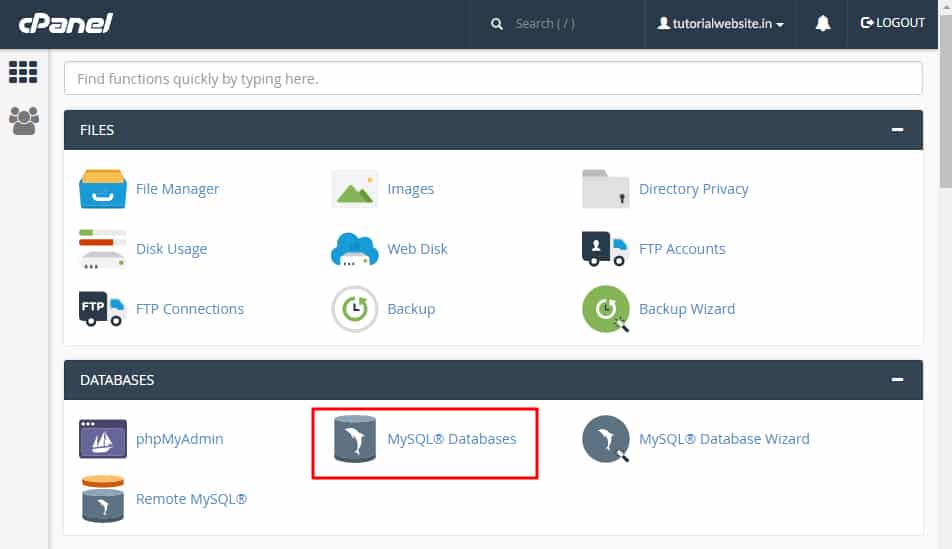
Click MySQL Databases on the main cPanel page.
On the next page, specify a new database name and click Create Database .
2. Create a MySQL User
Every database must have a user. To create a user for your new database, scroll to the Add New User section . There, specify the desired username and password. Click Create User if you have.
Now you need to insert the user you just created into the new database. Scroll to the Add User to Database section . Click the User column to select a user. Then, select the new database in the Database column . If so, click Add . You will be taken to the Manage User Privileges page .
3. Granting Access Rights to Users
On the Manage User Privileges page there are many types of access rights. Now, check the checkbox of the permissions you specified for the new user. Click Make Changes when you’re done.
How to Create Addon Domain in cPanel
Domain addon is a solution for those of you who want to have a new domain in one hosting account. Well, how to make it in cPanel is not complicated. Let’s follow the steps below.
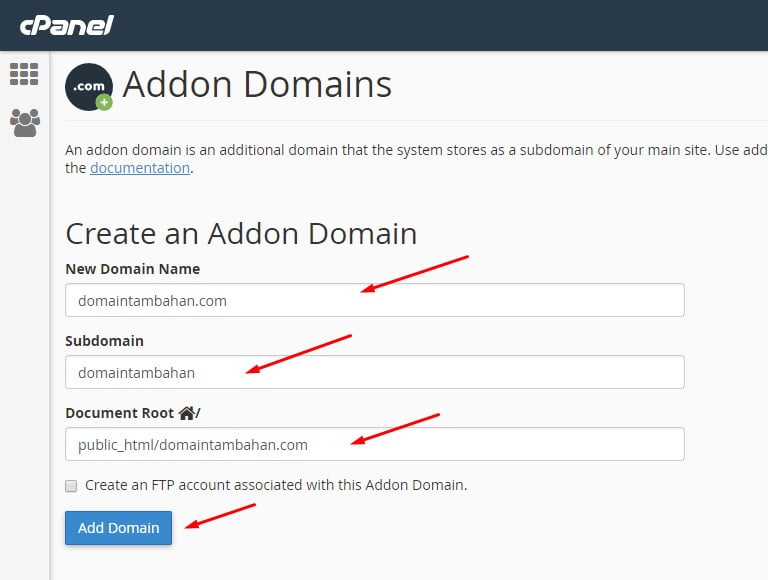
First of all, click on the Addon Domains menu on the main cPanel page.
On the next page you will find a form to create an addon domain. The following is the information you should enter in each of the fields:
- New domain name : addon domain you want.
- Subdomain : addon domain subdomain. cPanel automatically fills this field according to your addon domain.
- Document root : the main folder belonging to the addon domain. cPanel also autofills these fields.
If you want to create an FTP account for this addon domain, you need to check the Create an FTP account associated with this Addon Domain checkbox . The username and password fields for the FTP account will appear. When finished, click Add Domain .
Addon domains that you create will appear in the Modify Addon Domains list . In this list, you can also remove the addon domain or specify the URL that you want to redirect to the addon domain.
How to Create a Subdomain in cPanel

Perhaps you want to create a subdomain for a separate section of an existing website. If so, one way is to create a subdomain in cPanel. Here’s how.
To create a subdomain, click the Subdomains menu on the main cPanel page.
Under the text Create a Subdomain , you’ll find three columns. Well, below are the fields along with the information that you must fill in:
- Subdomain : fill with the subdomain you want.
- Domain : select the domain for which you want to create a subdomain.
- Document Root : specify the name of the subdomain main folder. This folder is automatically created inside the public_html folder .
If so, click Create to create a subdomain.
Next, you just need to upload the files that the website needs to the main subdomain folder via the cPanel file manager.
How to Add Parked Domain in cPanel
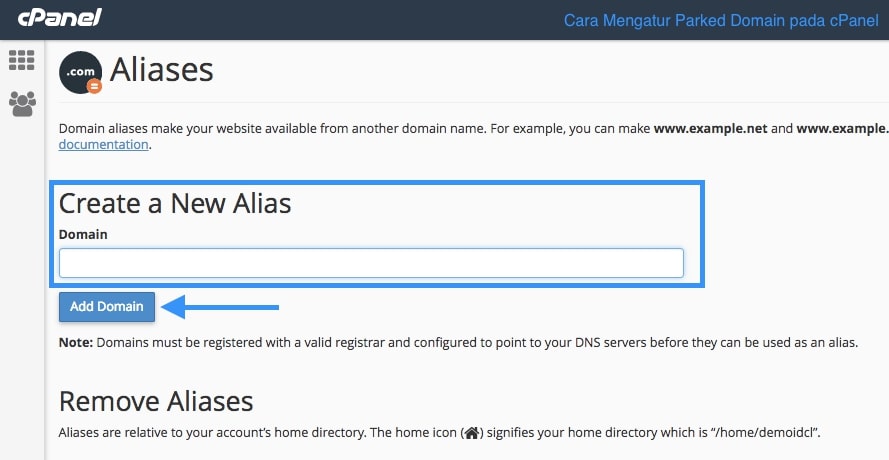
You might buy a domain with multiple extensions at once to maintain the brand. If so, you can connect it to your primary domain as a parked domain. Below is how to do it in cPanel.
1. Adding Aliases
Access the Aliases menu on the main cPanel page.
In the field below the text Create a New Alias , type your parked domain and click Add Domain .
2. Linking Aliases to Main Domain
In the Aliases menu, scroll down until you find the Remove Aliases text . Parked domains you’ve added will be listed under the text. Well, now you just click Manage Redirection . On the next page, type the primary domain in the field provided, then click Save .
How to Add or Change DNS Records in cPanel
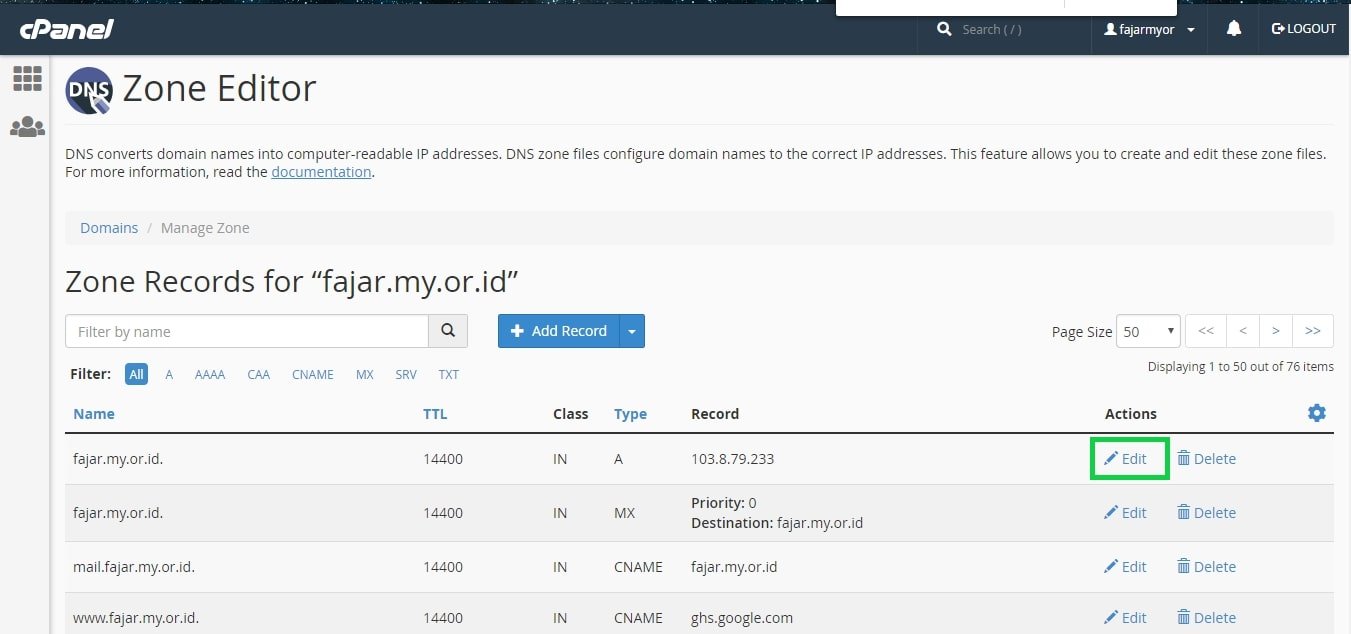
As a domain owner, you may need to tinker with its DNS records. For example, when you want to connect a domain with email marketing tools or free hosting services. To do this, you can use the DNS zone editor in cPanel.
First of all, you have to access the Zone Editor menu .
On the next page, you will find an interface as shown below:
To add a DNS record to your domain, all you have to do is click the desired type (A, CNAME, or MX record).
However, you can also add other types of DNS records, such as SRV and TXT records. To do this, click the Manage button .
On the next page, find the Add Record button as indicated by the arrow in the following image.
Then, click the button with the down arrow symbol to the right of it. A list of DNS record types will appear for you to choose.
On this page you can change DNS record settings or delete them. To do this, all you have to do is click Edit or Delete to the right of the DNS record you want.
How to Create an Email Account in cPanel
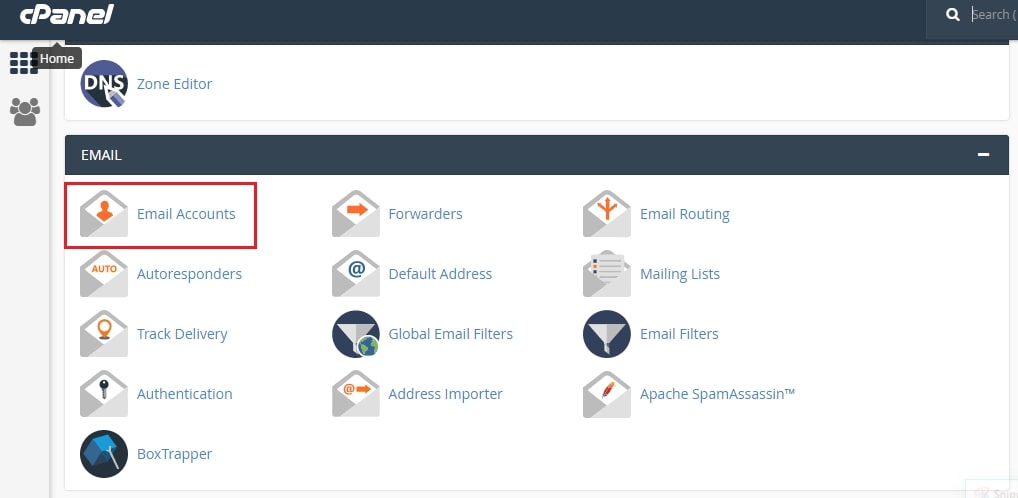
Your hosting account already includes features for using email. Well, to create an email account, you have to do it in cPanel. Follow the steps below.
1. Access the Email Accounts Menu
To create an email account, click Email Accounts on the main cPanel page.
If you have entered the menu, click the Create button as shown in the following image. A new page will appear.
2. Fill in the Email Account Form
On the page that appears there is a form that you must fill out to create an email account. Now, enter the username and password you want in their respective fields.
If you want to make additional settings, click Edit Settings . In these additional settings, you can specify three things, namely:
- Disk space usage limit
- Set so that the email folder is not created automatically when there is an incoming email that uses a plus address
- Sending an email client setup guide to the address you want to create
To finish creating an email account, click Create .
How to Enable Two-Factor Authentication in cPanel

Two-factor authentication has become the online security standard. Your cPanel needs it too. Fortunately, cPanel offers an easy way to enable two-factor authentication. Follow the method below.
1. Setup Two-Factor Authentication
On the main cPanel page, click Two-Factor Authentication .
After entering the menu, click Set Up Two-Factor Authentication .
2. Connect cPanel with Two-Factor Authentication App
cPanel will provide a QR code for you to scan with a two-factor authentication application. This QR code is used to connect cPanel with the application.
However, if you can’t scan the QR code, you can enter your cPanel username and key code into the two-factor authentication application. Place the username and key code under the QR code.
3. Enter the Security Code
After scanning the QR code or entering your username and key code, the two-factor authentication app will provide you with a security code. Enter this code into the column provided under the key code. If so, click Configure Two-Factor Authentication .
How to Create Error Pages in cPanel

An error page is a page that notifies website visitors that there was an error when they accessed your website. An example is a 404 error which indicates that the URL that the visitor went to is not available on the website.
Well, you can create error pages for various types of website errors in cPanel. In this guide we will create a 404 error page as an example.
1.Choose an Error Type
First of all, click on Error Pages on the main cPanel page.
On the next page, select the domain whose error page you want to create. Then click the error type whose page you want to create. You will be taken to a page to create an error page.
2. Creating Error Pages
The error page editor page contains an HTML editor that you must fill in. To help you, cPanel provides several HTML tags that can be inserted into the editor, namely:
- Referring URL : URL that takes visitors to a URL that is not on your site.
- Visitor’s IP address : the visitor ‘s IP address .
- Requested URL : The URL that the visitor wants to access, but is not on your site.
- Servername : server name.
- Visitor’s browser : the type of browser the visitor uses.
- Redirect status code : displays the website error code.
When you’ve finished creating your error page, click the Save button at the bottom of the editor.
How to Create a Cron Job in cPanel
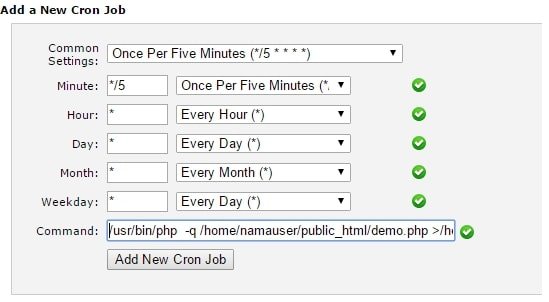
Cron jobs are a way to automatically schedule Linux commands and scripts on web servers. If you are already familiar with cron jobs, cPanel provides features to use them. Follow the steps below to take advantage of this feature.
1. Setup Cron Email
Find and click Cron Jobs on the main cPanel page.
You should know that cPanel sends a report every time a cron job is run to your domain’s email address. If you want to redirect the report to a different email address, type the address in the field below the Cron Email text .
However, if you don’t want to get the cron job report, you can run the command mycommand >/dev/null 2>&1 in the command column which will be explained in the next step.
2. Create a Cron Job
Under the Cron Email field you will find a form to fill out to create a cron job. The following is the information you must enter on the form:
- Common settings : settings that are commonly used, for example once in a minute, hour, or day.
- Minute : the minute the command was executed.
- Hour : the hour at which the command is executed.
- Day : the date on which the command was executed.
- Month : the month in which the command was executed.
- Weekday : the day on which the command is executed.
- Command : the command you want to automate.
After setting up the cron job, click Add New Cron Job .
3. Manage Cron Jobs
Cron jobs that you have created will appear in the list under the text Current Cron Jobs . In this list, you can change the cron job settings or delete them. To do so, click the Edit or Delete button .
How to Use Website Optimization Tools in cPanel
You can increase website loading speed by compressing the files. Well, you don’t need to install a WordPress plugin to do that. You can compress files via the Optimize Website menu in cPanel.
In the Optimize Website menu there are three options that you can choose from:
- Disabled : does not run compression.
- Compress All Content : compress all files.
- Compress the specified MIME types : compresses only the file types you specify, for example HTML and XML text. You can specify the file type by typing it in the column provided.
If so, click Update Settings .
Conclusion
cPanel is a control panel that has many features that are very helpful for users in terms of managing web hosting. Not only limited to website management, users also have the flexibility to manage incoming email to their domain.
Thanks for reading the article about what cPanel is and how to use it. If you still have questions about what cPanel is, don’t hesitate to ask in the comments below. Hopefully after reading this article you have understood the cpanel function, the meaning of cpanel, where to download cpanel, the benefits of cpanel, what is cpanel and how to use it. See you


